Using Dall-E/AI to create kids colouring pages in KidzFun.art

Over the past couple of years I’ve been building KidzFun.art, an art & education app for my young kids and hopefully yours. The first feature I ever added was simple colouring pages, hand drawn by my lovely and talented wife. However that was a slow and laborious process, and with the advances in AI since I began, I decided to add the ability for young children to generate a near infinite number of fun, age-appropriate, colouring pages using AI.

I chose to use Open AI’s Dall-E for this, partly as an excuse to use their SDK in production, which is generated by a fantastic company I’m advising called Stainless.

There were four main things required in order to ship this feature:

  1. Use the Open AI Node SDK to generate the image. This turned out to be by far the simplest, hat tip to Stainless and the Open AI team
  2. Build a UI suitable for young children that gave them the ability to easily create an infinite number of colouring pages, while ensuring that the generated content is age-appropriate.
  3. Allow parents (but not their kids) to pay for the Open AI costs, so I don’t go broke.
  4. Cache as much generated content as is feasible to minimize the costs

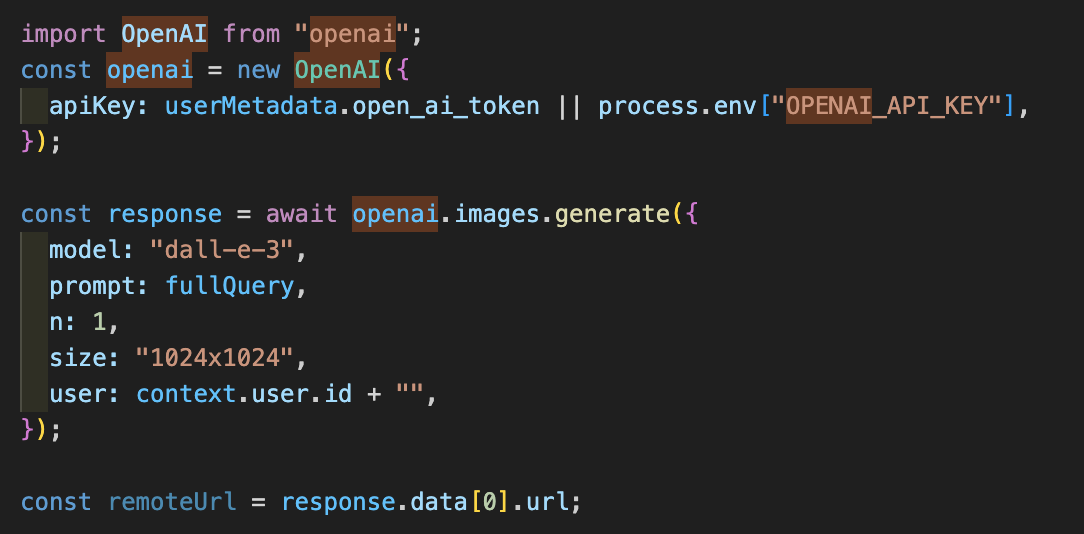
Using the OpenAI Node SDK

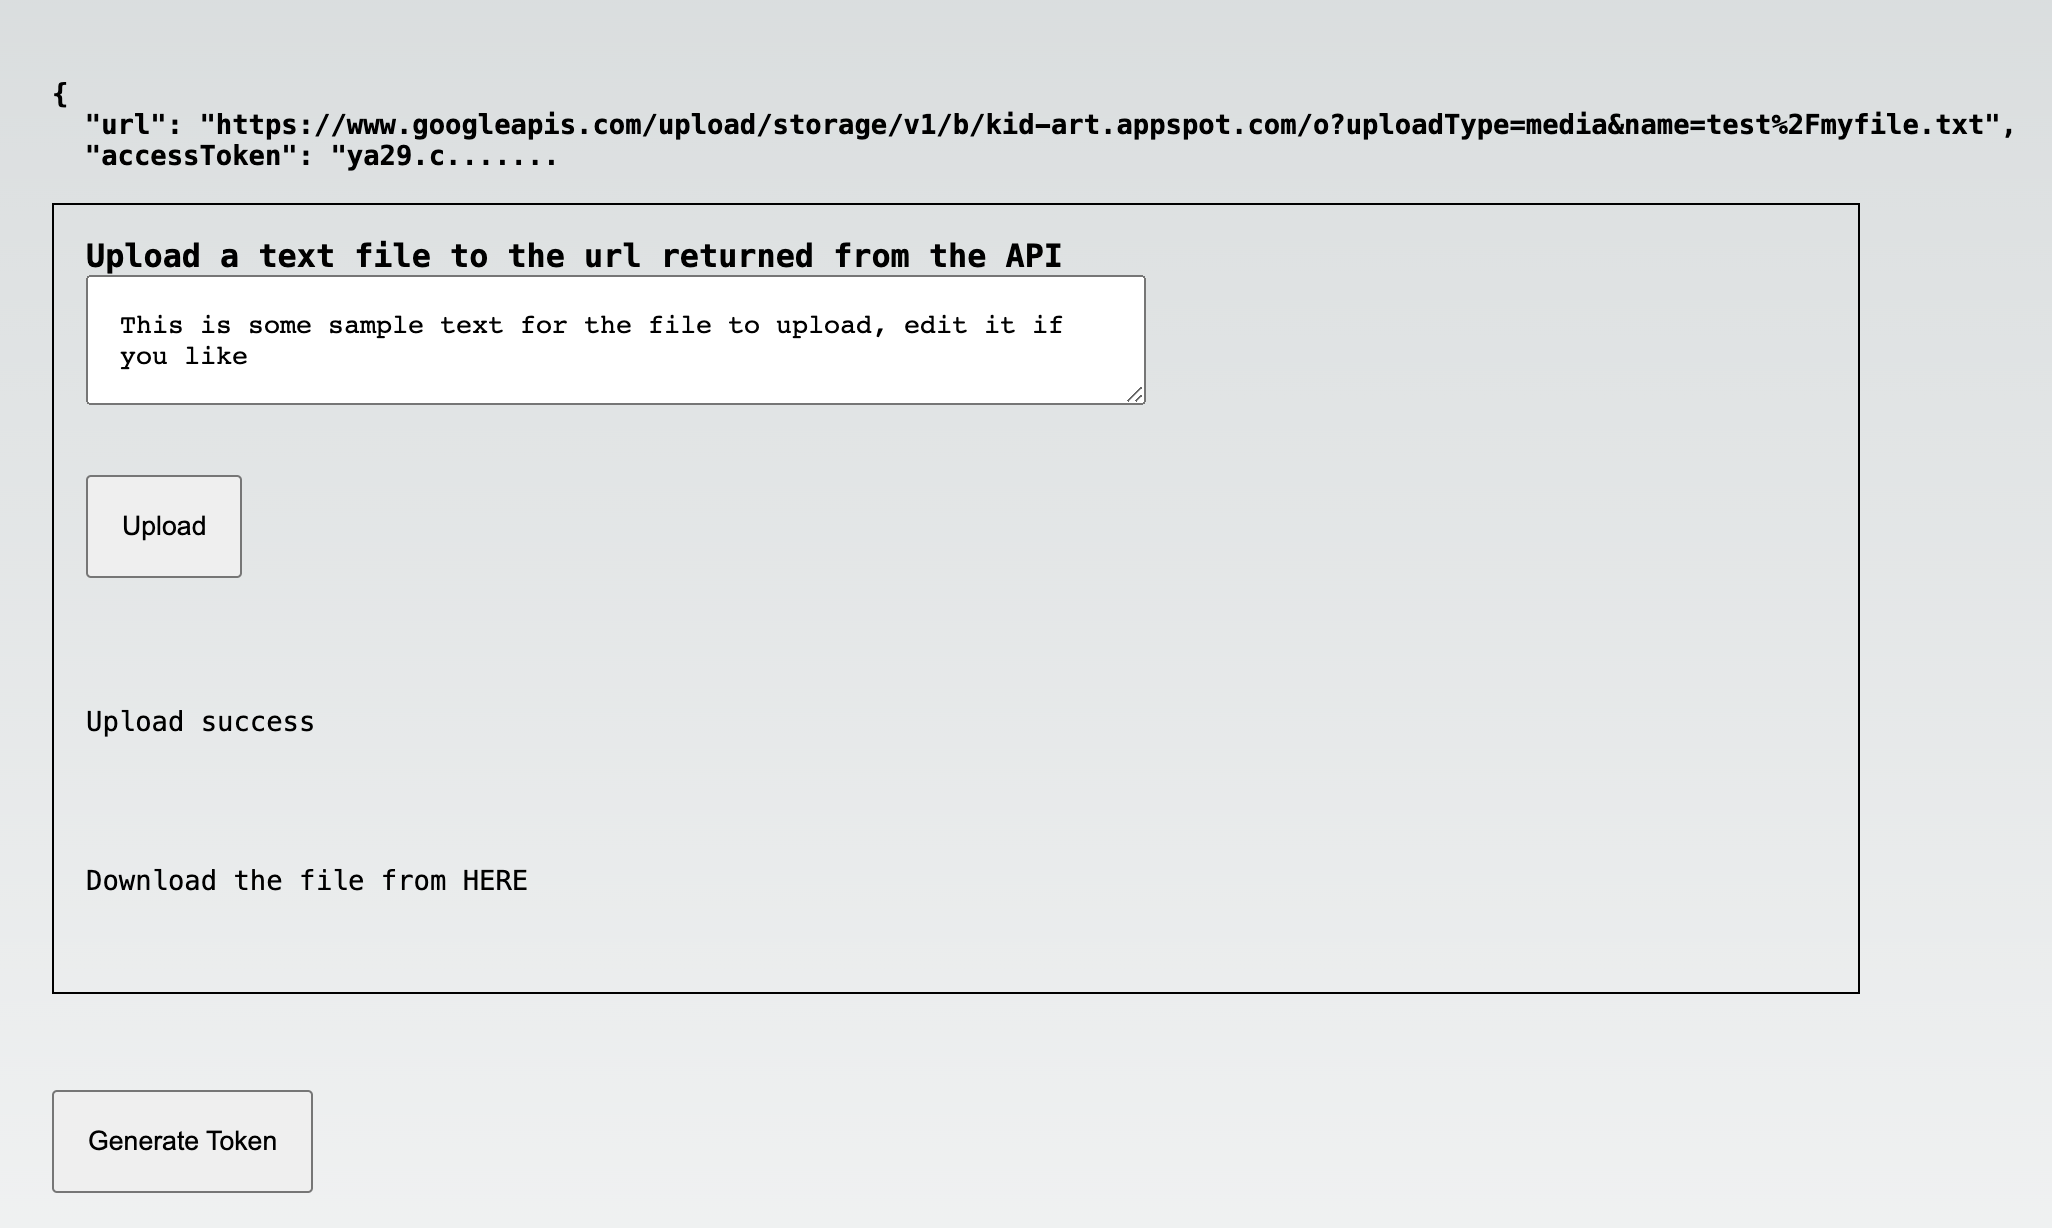
This part was trivial. I created a new NextJS API endpoint that accepted a query parameter, created the OpenAI object using either an API token provided by the user (more on that later), or the default one on my account.

Then simply call the openai.images.generate function and after a few seconds (it’s not particularly fast) it returns you an array of URLs, in my case just one.

A UI suitable and safe for young kids

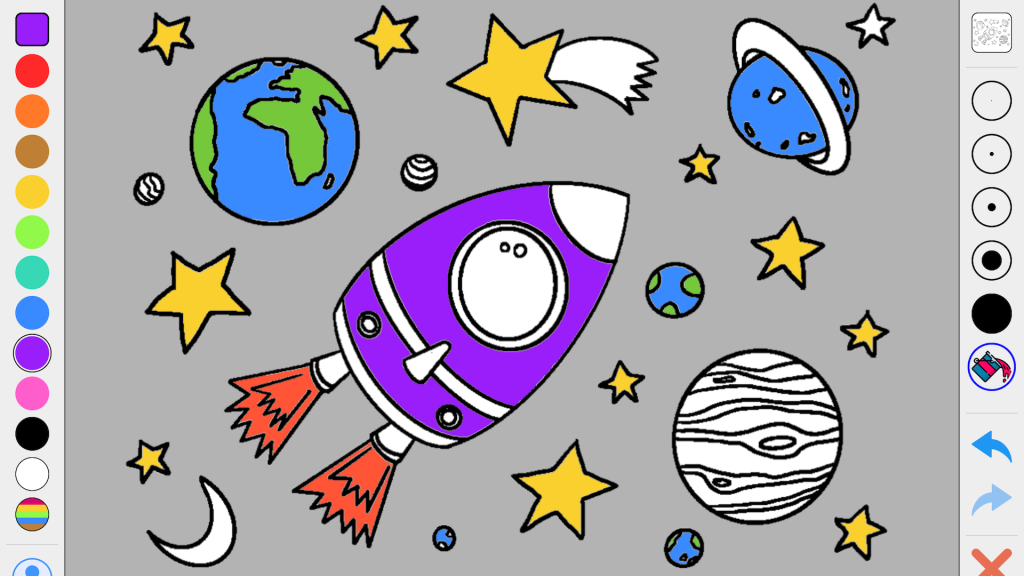
To make the UI simple, I created a tabbed UI that let kids selected up to ten things to put into the colouring page. When testing this with my 5 and 7 year olds, they found it intuitive – you can’t beat having your users living in your house!

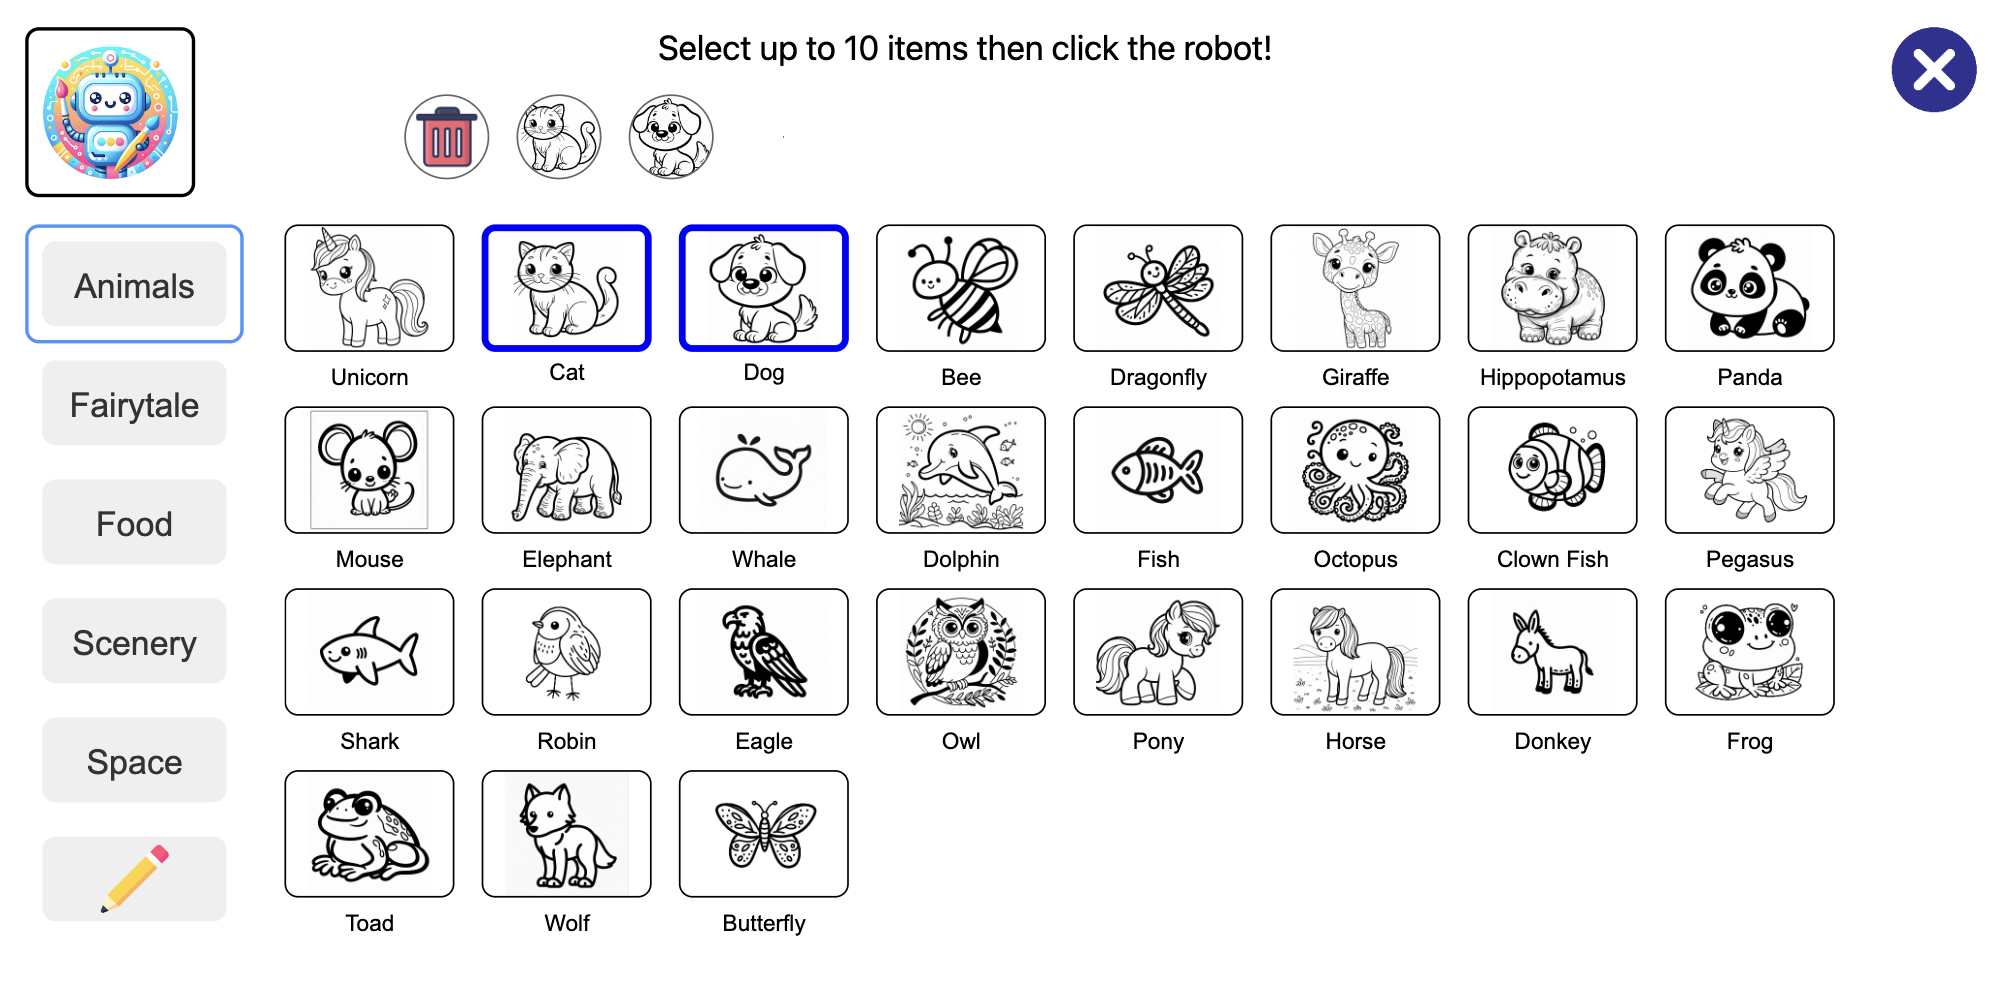
Some older kids may want more control, so I also allowed them to type in the image description manually, using the pencil icon you see in the image above.

To ensure the images are safe, I add a number of instructions on the server side to instruct OpenAI to only generate age appropriate content.

Simple payment for adults only

Using Dall-E costs money, and so it’s necessary for users to pay for this. I kept it simple, allowing parents to buy a pack of 100 image generations at a time, which is likely to last a long long time (see later for why).

You never want to be in a situation as an app developer where a child accidentally spends their parents money. To prevent this, the parent must provide the last four digits of their credit card. I use Stripe for payments, and users of the AI generation feature must already be subscribers, so I have a record of their credit card and I can simply match against that.

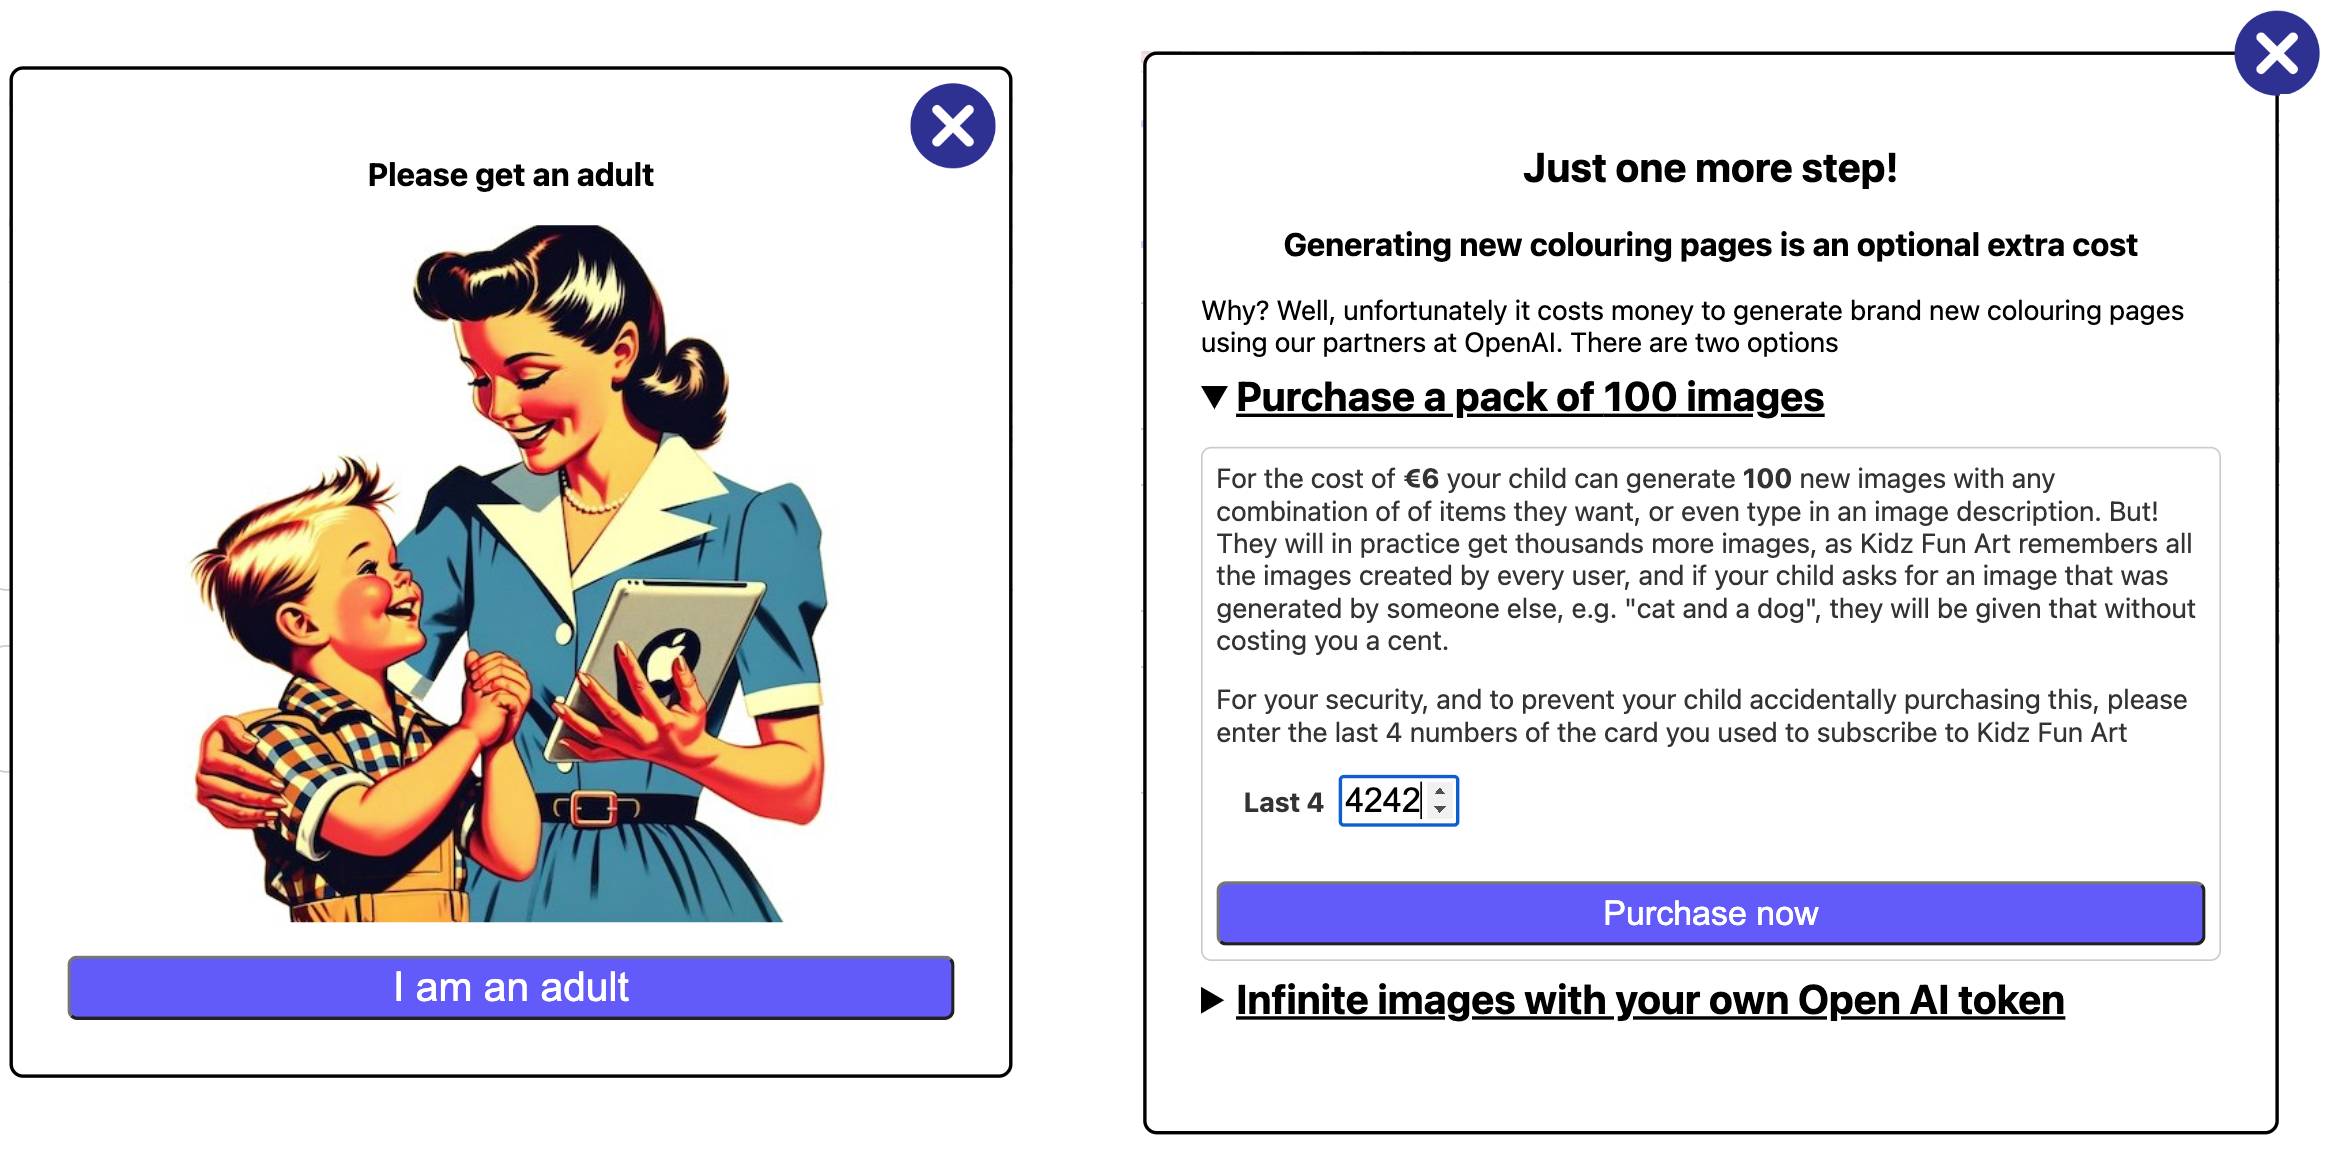
Of course, if you’re technically minded and want full control over the spending and budget, you can generate your own Open AI API key and provide that instead of purchasing a pack of pictures.

Caching to minimize costs

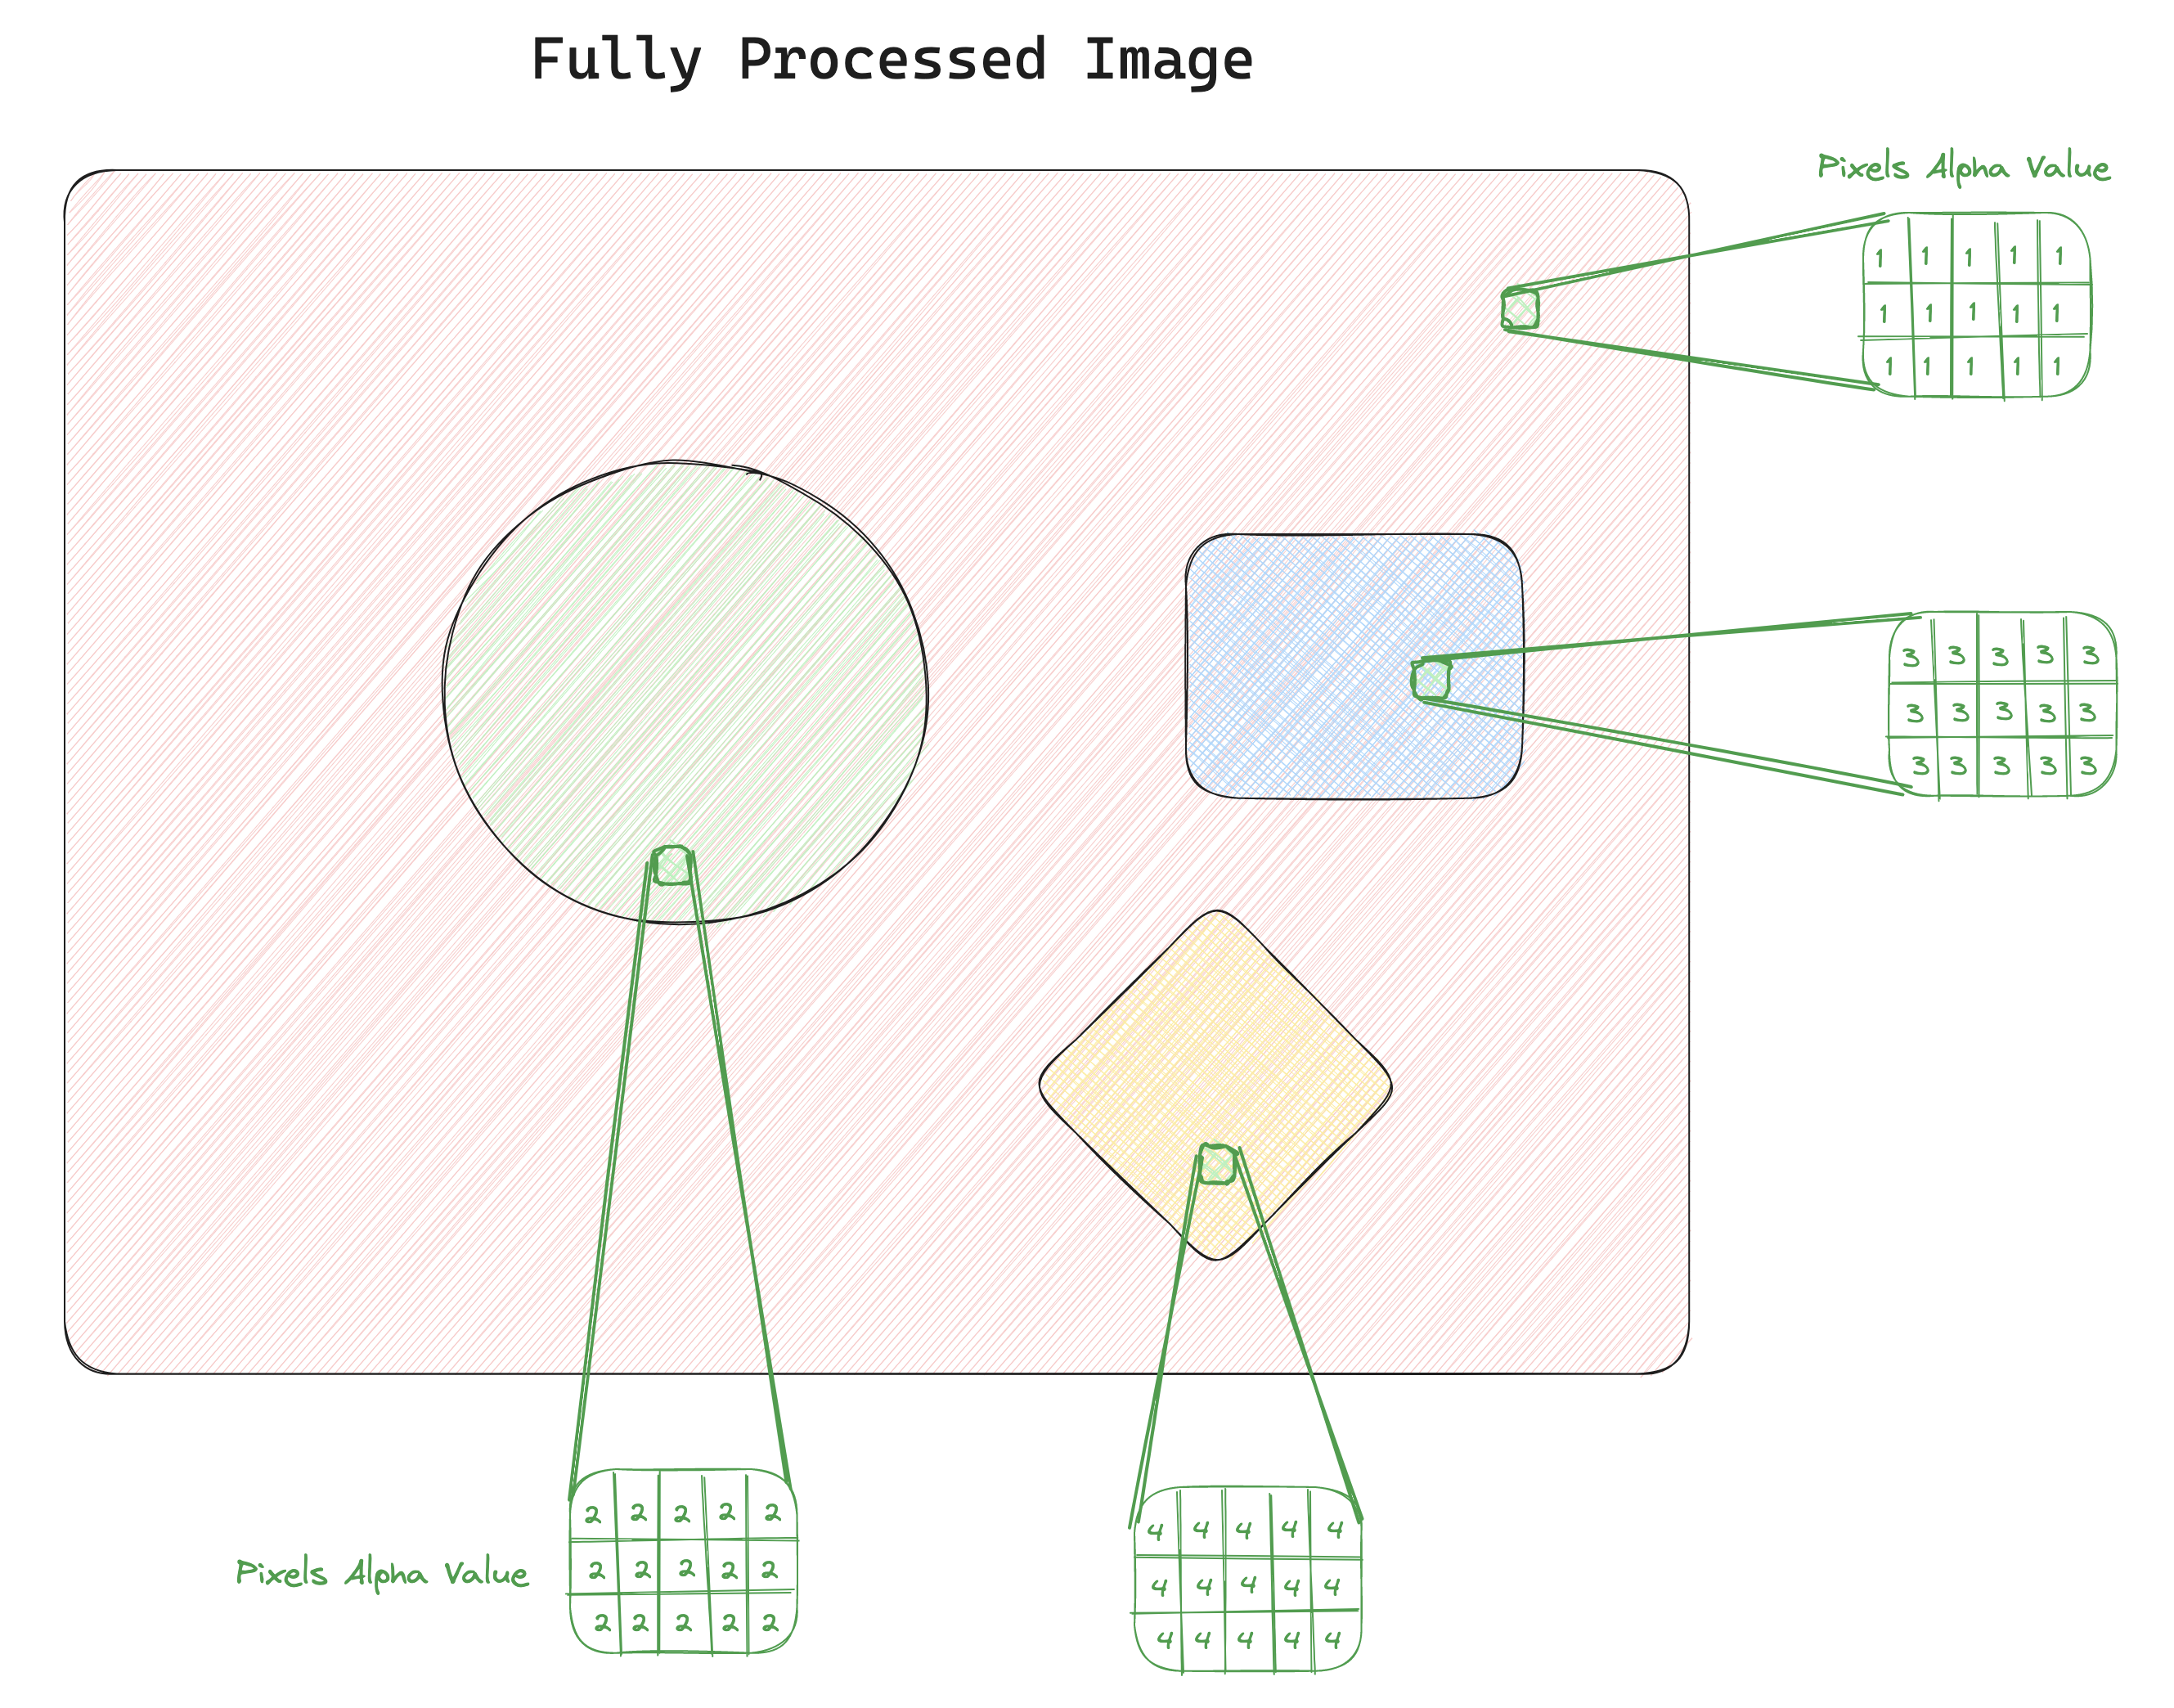
A large benefit of providing pre-determined items to place in the picture to kids, rather than free text, is that it is likely that there will be many similar requests. I use this to cut down on generation costs. I use Firebase and Google Storage on the back end, and every time that a child accepts a generated image, I cache both a large and a small version of the image in Google Storage, and make a record of it in Firebase, noting the “tokens” associated with it, e.g. “dog, cat, classroom”.

The next time a child selects “dog, cat, classroom”, they will be shown the cached image first, without subtracting from their count of purchased image generations. It’s only once the child rejects all the cached images that they cause a new image to be generated with Dall-E and subtracts from their pre-purchased allocation. In this way, as more children use the feature, it will take longer and longer for the purchased allocation to run out.

For the sake of safety, only images generated by selecting the provided tokens are cached. If a user writes in free form text that image is never cached nor shown to anyone else. They simply download it and colour it in.

That’s all folks!

Go try out KidzFun.art today on any tablet, laptop or desktop!

Quick chicken soup recipe for sick people

Thanks to ChatGPT for this recipe with no stupid SEO in it. Total time to make: 80 minutes if you’re a normal slow chopper of vegetables (like me), 50 minutes if you’re super fast with a knife.

For a simple chicken soup with potatoes, you’ll need the following ingredients:

500g (1 lb) chicken breast or thighs, cut into bite-sized pieces

  • 4 medium potatoes, peeled and diced
  • 1 large onion, chopped
  • 2 cloves of garlic, minced
  • 1.2L (6 cups) chicken broth or stock
  • 1 teaspoon salt (adjust to taste)
  • 1/2 teaspoon black pepper
  • 2 tablespoons olive oil or butter
  • Optional: chopped fresh parsley or dill for garnish

Here’s how to make it:

  1. In a large pot, heat the olive oil or butter over medium heat. Add the chopped onion and garlic, sautéing until they’re soft and fragrant, about 2-3 minutes.
  2. Add the chicken pieces to the pot and cook until they’re no longer pink on the outside, about 5-7 minutes.
  3. Add the diced potatoes to the pot along with the chicken broth. Bring the mixture to a boil.
  4. Once boiling, reduce the heat to a simmer and cover the pot. Let it simmer for about 20-25 minutes, or until the potatoes are tender.
  5. Season the soup with salt and pepper. Taste and adjust the seasoning as necessary.
  6. Serve hot, garnished with chopped fresh parsley or dill if desired.

Here’s how it looked when I made it for my 7 year old. She got some of it down the first time and liked it, then had more as she felt better.

No need to read this bit, look after yourself/your person.

But yeah, I hate all the recipes online these days that bury what you really want under mountains of SEO crap. So, while my blog is almost exclusively tech, every now and then I have a sick kid and no bloody patience for that SEO nonsense so this is the recipe that worked for me thanks to ChatGPT, and now I can easily find it forever!

How to list all files in a browser’s Origin Private File System

In case you’re working with the Origin Private File System on a browser whose dev tools don’t yet support browsing the files (all browsers as of Nov 2023, though Chrome does have an unofficial extension which is nice), then here’s a code snippet you can use to list all the contents of the file system

listDirectoryContents = async (directoryHandle, depth) => {
  depth = depth || 1;
  directoryHandle = directoryHandle || await navigator.storage.getDirectory();
  const entries = await directoryHandle.values();

  for await (const entry of entries) {
    // Add proper indentation based on the depth
    const indentation = '  '.repeat(depth);

    if (entry.kind === 'directory') {
      // If it's a directory, log its name 
      // and recursively list its contents
      console.log(`${indentation}${entry.name}/`);
      await listDirectoryContents(entry, depth + 1);
    } else {
      // If it's a file, log its name
      console.log(`${indentation}${entry.name}`);
    }
  }
}

How to clean up after your NextJS dev server

Sometimes you need to modify files when building a web application that must be reverted before committing. In my case I’m building a Chrome extension that reads from a NextJS based web service, and when I’m working on the browser extension it reads from http://localhost:3005, so I have to modify its manifest.json file to allow this. Of course, I cannot leave that change in the file as it would be a privacy issue and Google would rightly reject it.

Rather than leaving this up to me remembering to manually revert the manifest.json change, here’s how you can do it in bash. The idea is that, when starting up the NextJS process, you run your setup script, and then you listen to the termination signal for the server and execute the cleanup script

Modify package.json

We’re going to use the standard npm run dev command to do all the setup and cleanup work, so make a new script command in the package.json file that runs the standard `next dev` command, e.g.

"scripts": {
  "dev": "./scripts/dev.sh",
  "nextdev": "next dev"
}

Create a dev.sh script

Now create the dev.sh script mentioned above, assuming it is the scripts folder and your setup and cleanup scripts are in the same folder and named run_setup_script.sh and run_cleanup_script.sh respectively

# Get the directory of the script
script_dir="$(dirname "$0")"

"$script_dir/run_setup_script.sh"

on_termination() {
    # Add your cleanup script or command here
    echo "cleaning up dev environment"
    "$script_dir/run_cleanup_script.sh"  
}

# Set up the trap to call on_termination() 
# when a signal is received that shuts it down

# SIGINT is sent when you kill it with Ctrl+C
trap on_termination SIGINT
trap on_termination SIGTERM

# EXIT is sent when the node process calls process.exit()
trap on_termination EXIT

# Now run your NextJS server
npm run nextdev

Lightweight NextJS example of uploading files to Google Cloud Storage

Many years ago, back in 2018, I wrote a tiny NPM package called gcloud-storage-json-upload, which lets you authenticate with Google Cloud Storage and upload a file without needing to install any huge Google SDKs. I recently needed to use it with NextJS to upload Gifs created in my iPad/tablet/browser app Kidz Fun Art (you can make animations now!), so I wrote a simple example of how you can do this too.

It shows how you create an API endpoint that uses the gcloud-storage-json-upload package to authenticate with Google and returns a token to the client. The client then uses this token to upload a file to a Google Cloud Storage bucket.

All the code is available on GitHub, I hope it’s helpful.

Instant colour fill with HTML Canvas

TLDR: Demo is at https://shaneosullivan.github.io/example-canvas-fill/ , code is at https://github.com/shaneosullivan/example-canvas-fill .

The Problem

When building a website or app using HTML Canvas, it’s often a requirement to support a flood fill. That is, when the user chooses a colour and clicks on a pixel, fill all the surrounding pixels that match the colour of the clicked pixel with the user’s chosen colour.

To do so you can write a fairly simple algorithm to step through the pixels one at a time, compare them to the clicked pixel and either change their colour or not. If you redraw the canvas while doing this, so as to provide the user with visual feedback, it can look like this.

This works but is slow and ugly. It’s possible to greatly speed this up, so that it is essentially instant, and looks like this

To achieve this we pre-process the source image and use the output to instantly apply a coloured mask to the HTML Canvas.

Why did I work on this?

I’ve built a web based app called Kidz Fun Art for my two young daughters, optimised for use on a tablet. The idea was to build something fun that never shows adverts to them or tricks them into sneaky purchases by “accident”. I saw them get irritated by the slow fill algorithm I first wrote, so my personal pride forced me to go solve this problem! Here’s what the final implementation of the solution to this problem looks like on the app.

The Solution

[Edit: After initially publishing, a large speed up was achieved by using OffscreenCanvas in this commit]

Start with an image that has a number of enclosed areas, each with a uniform colour inside those areas. In this example, we’ll use an image with four enclosed areas, numbered 1 through 4.

Now create a web worker, which is JavaScript that runs on a separate thread to the browser thread, so it does not lock up the user interface when processing a lot of data.

let worker = new Worker("./src/worker.js");

The worker.js file contains the code to execute the fill algorithm. In the browser UI code, send the image pixels to the worker by drawing the image to a Canvas element and calling the getImageData function. Note that you send an ImageBuffer object to the worker, not the ImageData itself


const canvas = document.getElementById('mycanvas');const context = canvas.getContext('2d');

const dimensions = { height: canvas.height, width: canvas.width };

const img = new Image();
img.onload = () => {
  context.drawImage(img, 0, 0);
  
  const imageData = 
    canvas.getImageData(0, 0, dimensions.width, dimensions.height);

  worker.postMessage({
      action: "process",
      dimensions,
      buffer: imageData.data.buffer,
    }, 
    [imageData.data.buffer]
  );
};

The worker script then asynchronously inspects every pixel in the image. It starts by setting the alpha (transparency) value of each pixel to zero, which marks the pixel as unprocessed. When it finds a pixel with a zero alpha value, it executes a FILL operation from that pixel, where every surrounding pixel is given an incremental alpha value. That is, the first time a fill is executed, all surrounding pixels are given an alpha version of 1, the second time an alpha value of 2 is assigned, and so on.

Each time a FILL completes, the worker stores an standalone image of just the area used by the FILL (stored as an array of numbers). When it has inspected all pixels in the source image, it will send back to the UI thread all the individual image ‘masks’ it has calculated, as well as a single image with all of the alpha values set numbers between 1 and 255. This means that using this methodology, we can support a maximum of 255 distinct areas to instant-fill, which should be fine, as we can fall back to a slow fill if a given pixel has not been pre-processed.

You see in the fully processed image above that all pixels in the source image are assigned an alpha value. The numeric value corresponds to one of the masks, as shown below.

For this image, it would generate four masks as in the image above. The red areas are the pixels with non-zero alpha values, and the white are the pixels with alpha values of zero.

When the user clicks on a pixel of the HTML Canvas node, the UI code checks the alpha value in the image returned from the worker. If the value is 2, it selects the second item in the array of masks it received.

Now it is time to use some HTML Canvas magic, by way of the globalCompositeOperation property. This property enables all sorts of fun and interesting operations to be performed with Canvas, but for our purposes we are interested in the source-in value. This makes it so that calling fillRect() on the Canvas context will only fill the non-transparent pixels, and leave the others unchanged.

const pixelMaskContext = pixelMaskCanvasNode.getContext('2d');
const pixelMaskImageData = new ImageData(
  pixelMaskInfo.width,
  pixelMaskInfo.height
);

pixelMaskImageData.data.set(
  new Uint8ClampedArray(pixelMaskInfo.pixels)
);

pixelMaskContext.putImageData(pixelMaskImageData, 0, 0);

// Here's the canvas magic that makes it just draw the non
// transparent pixels onto our main canvas
pixelMaskContext.globalCompositeOperation = "source-in";
pixelMaskContext.fillStyle = colour;

pixelMaskContext.fillRect(
  0, 0, pixelMaskInfo.width, pixelMaskInfo.height
);

Now you’ve filled the mask with a colour, in this example purple, then you just have to draw that onto the canvas visible to the user at the top left location of the mask, and you’re done!

context.drawImage(
  pixelMaskCanvasNode,
  pixelMaskInfo.x,
  pixelMaskInfo.y
);

It should look like the image below when done

All the code for this is available on Github at https://github.com/shaneosullivan/example-canvas-fill

You can see the demo running at https://shaneosullivan.github.io/example-canvas-fill/

One caveat is that if you try this code on your local computer by just opening the index.html file, it will not work as browser security will not let the Worker be registered. You need run a localhost server and run it from there.

P.S.

Thanks to the Excalidraw team for making it so easy to create these diagrams, what a fantastic app!

Using Bun.js as a bundler

Bun.js is a new (as of 2023) JavaScript runtime that is still very much in development, with it’s primary focus being on extreme speed. I’ve been following it for a while but until today haven’t had a good excuse to use it.

(Edit: There’s some good conversation about this post on Hacker News here)

The author, Jarred Sumner, announced on Twitter today that they have shipped a beta version of a new code bundler for Bun, showing some crazy speed increases over other bundlers. This piqued my interest, as I use a combination of Webpack, Browserify and Uglify on my side projects, in this case my tablet PWA that I built for my kids kidzfun.art, which work but are really slow.

My current workflow can result in a 5 – 7 second wait for all my JS files to rebuild when I save a file, and I thought that Bun could help with this. It turns out I was right! …. with caveats.

You can see the docs for Bun.build() at https://bun.sh/docs/cli/build , and they are well written and quite comprehensive.

My requirements were to

  • Build multiple files quickly, each of which imports multiple other 3rd party files from node_modules.
  • Build minified and non-minified files
  • The resulting file can be included directly in a browser using a <script> tag.

Getting started

I started off by running default build code (for Bun v0.6.1)

const myFiles = [...];

await Bun.build({
  entrypoints: [myFiles],
  outdir: './build'
});

by adding a script to my package.json file

 "build-browser": "bun scripts/build-browser.js"

and this worked just fine. More importantly, it was crazily fast. Instead of 5 seconds it now seemed to finish as the Enter key was still traveling back upwards from executing the command. Nice!

Minification

Minification looks simple in the docs, but unfortunately it’s where the beta nature of Bun shows up. Running the code above with minification

const myFiles = [...];

await Bun.build({
  entrypoints: [myFiles],
  outdir: './build',
  minify: true
});

results in an error being thrown that shuts down the process if there is more than one entry point file.

Bus error: 10

Searching the web didn’t turn up anything, but the solution is to only pass a single entry point file path to Bun.build() if you are minifying the code. Throw that in a for loop to get through all the files and it runs just fine!

A second issue with the default minification is that it broke my app in strange ways that I could not track down – I’m guessing that it’s rewriting the code in some way that is not fully stable yet. I solved it by turning off the syntax minification option

const myFiles = [...];

await Bun.build({
  entrypoints: [myFiles],
  outdir: './build',
  minify:{
    whitespace: true,
    identifiers: true,
    syntax: false // Setting this to false fixes the issue
  }
});

Removing Exports

Bun inserts code that looks like this at the bottom of the built file, in this case from a file called account.ts

var account_default = {};
export {
  account_default as default
};

If you load this in a browser <script> tag it will throw an error. I couldn’t find a way to tell Bun how to not output this, so I had to write a relatively simple function to detect this at the end of each output file and remove it.

Watch issues

I have some code that uses the node-watch module to automatically re-run the build when a file changes. Under the hood this uses the fs.watch function, which it turns out Bun does not yet support. Here’s the Github issue tracking it. I tried to use the native Bun watch functionality, but this executed the script code which is not what I’m looking for.

I came up with a hacky solution that works fairly well, where I use the RunOnSave extension for VS Code to execute

touch ./.last_modified_timestamp

every time I save a file. Then in my build script I use setInterval to check the last modified time of this file and re-run the build if it has changed. Hacky but it works. Hopefully Bun will implement fs.watch soon and I can throw out this code.

function build() {
  ...
}

const timestampFilePath = `${rootDir}/.last_modified_timestamp`;
if (fs.existsSync(timestampFilePath)) {
  let lastModifiedRootFolder = 0;
  setInterval(() => {
    const stat = fs.statSync(timestampFilePath);
    if (stat.mtime.getTime() !== lastModifiedRootFolder) {
      lastModifiedRootFolder = stat.mtime.getTime();
      build();
    }
  }, 500);
}

Vercel build failures

Once everything was running just fine locally on my Mac, I pushed the branch to Github so Vercel would build it (it’s a NextJS application). This threw up a new issue. My build script uses the native Node exec() function to move and copy files. This works just fine on my Mac, but when running the build in the cloud environment all these calls would fail. There’s something unfinished with Bun’s implementation of the child_process module that breaks when run in the Vercel build environment.

My solution to this was to simply change all these execSync calls to use the Node fs functions, e.g.

import fs from 'fs';
....
fs.copyFileSync(srcPath, destPath);
fs.renameSync(path, `${rootDir}/public/${fileName}`);

Epilogue

After a few hours of work, reading up on Bun and working my way through these issues, I now have a much simpler build system that runs in the blink of an eye. My Vercel build times have reduced from 2 minutes to just 50 seconds (that’s all React stuff & fetching node_modules). My watch script runs in a few milliseconds instead of 5 or more seconds, My code is much simpler and I’ve removed Webpack, Browserify and Uglify from my projects.

Thanks so much to the Bun team for a great project. Even as early as it is at time of writing (mid 2023), it’s highly useful, and as they work through all the kinks it will only get more so. I look forward to using it more in the months and years to come!

… oh you’re still here?

The project I sped up using Bun is KidzFun.art, the iPad/tablet app I built for my kids. If you have young kids who

  • like to draw & colour,
  • do maths problems,
  • want to make Gifs from their drawings,
  • should never be shown ads, and
  • somehow care about the open web

have then try out my progressive web app 🙂

React.js: The Documentary & Q&A

In 2022 I had the great pleasure to chat with Ida Bechtle (https://twitter.com/BechtleIda) as part of a retelling of the early story of the creation of the React.js JavaScript library (I wrote about this previously here). The documentary is now available to watch for free on YouTube, as is the Q&A session that most of the cast took part in immediately after the premiere of the film on YouTube.

I’m incredibly impressed with the final product, which is almost totally down to the skill and hard work of Ida, the film maker, along with her employer Honeypot.io, who generously fund the creation of these types of documentaries. The film tells of the very non-linear and difficult path that React took to becoming the behemoth that it is today, and the important parts that so many dedicated people took to make it happen.

I think Tom Occhino summed it up well in the film, saying that taking any one person out of the early development of React would have resulted in the state of the project being fundamentally different to how it is today. I’m proud to have played a tiny role in it’s creation, and use it daily.

I hope you enjoy the film, and take away something valuable from it.

React.js: The Documentary

In mid-2022 I had a great time taking part in a documentary about the JavaScript framework ReactJS by the good people at Honeypot, along with many wonderful engineers who also played a part in its success. The film focuses on the early years in the life of ReactJS, including before it was open sourced and in the year or two afterward.

At time of writing (Dec 2022) I haven’t seen the full film, so I’m not sure how much of my content made it in to the final cut, but I did my best to provide colour into the very early days of ReactJS, where some of it’s early influences came from, and the struggles it faced gaining adoption both inside and outside of Facebook.

It will be released in Feb 2023, and here’s the trailer to whet your appetite

Kidz Fun Art – Tablet app for kids

I’ve built a fun new app for young kids, called Kidz Fun Art. Get it at https://kidzfun.art.

I’m a software engineer, but far more importantly I’m the happy dad of two amazing girls, currently 4 and 6 years old. They love to draw, colour in pictures and tell stories, and when I went looking for good iPad apps for them to use, all I could find were advert infected travesties that try to trick kids into clicking into inappropriate content. I was happy to pay for a clean app, but couldn’t find one.

So, I spent a couple of weeks and built one for them, and they love it! Your kids can use it too now at https://kidzfun.art.

It’s a tablet web app that works on mostly any tablet (I’ve tested it on iPads, Samsung Android and Microsoft Surface tablets). Your kids can us it for

  • Colour in lovely pictures that my wonderfully artistic wife Fran drew for the app.
  • Draw your own pictures on a blank canvas
  • Download images from the internet to colour in.
  • Stick a picture they’d like to copy in the corner so they can practice drawing it.
  • Practice writing their letters and numbers
  • Do simple mathematical problems, auto-generated each time so they never run out
  • Solve some puzzles
  • Draw comic books

I hope your kids enjoy it ask much as mine do